165 lines
5.3 KiB
Markdown
165 lines
5.3 KiB
Markdown
|
|
---
|
|||
|
|
title: 部署站点
|
|||
|
|
prev: /docs/guide/shortcodes
|
|||
|
|
next: /docs/advanced
|
|||
|
|
---
|
|||
|
|
|
|||
|
|
Hugo 生成静态站点,允许多种托管方式,你可以自由选择
|
|||
|
|
本页将给出部署你的 Hextra 站点的方法
|
|||
|
|
|
|||
|
|
<!--more-->
|
|||
|
|
|
|||
|
|
|
|||
|
|
## GitHub Pages
|
|||
|
|
|
|||
|
|
[GitHub Pages](https://docs.github.com/pages) 是免费部署和托管网站的推荐方法
|
|||
|
|
|
|||
|
|
如果您使用以下方式引导该网站 [hextra-starter-template](https://github.com/imfing/hextra-starter-template), 它提供了开箱即用的 GitHub Actions 工作流程,有助于自动部署到 GitHub Pages
|
|||
|
|
|
|||
|
|
{{% details title="GitHub Actions Configuration" closed="true" %}}
|
|||
|
|
|
|||
|
|
以下是配置来自 [hextra-starter-template](https://github.com/imfing/hextra-starter-template) 的 Workflow 的示例:
|
|||
|
|
|
|||
|
|
```yaml {filename=".github/workflows/pages.yaml"}
|
|||
|
|
# 用于构建 Hugo 站点并将其部署到 GitHub Pages 的示例工作流程
|
|||
|
|
name: Deploy Hugo site to Pages
|
|||
|
|
|
|||
|
|
on:
|
|||
|
|
# 由默认分支触发
|
|||
|
|
push:
|
|||
|
|
branches: ["main"]
|
|||
|
|
|
|||
|
|
# 允许手动运行
|
|||
|
|
workflow_dispatch:
|
|||
|
|
|
|||
|
|
# 设置 GITHUB_TOKEN 的权限以允许部署到 GitHub Pages
|
|||
|
|
permissions:
|
|||
|
|
contents: read
|
|||
|
|
pages: write
|
|||
|
|
id-token: write
|
|||
|
|
|
|||
|
|
# 仅允许一项并发部署,跳过正在进行的运行和最新排队的运行之间排队的运行
|
|||
|
|
# 但是,不要取消正在进行的运行,因为我们希望完成这些生产部署
|
|||
|
|
concurrency:
|
|||
|
|
group: "pages"
|
|||
|
|
cancel-in-progress: false
|
|||
|
|
|
|||
|
|
# 默认为 bash
|
|||
|
|
defaults:
|
|||
|
|
run:
|
|||
|
|
shell: bash
|
|||
|
|
|
|||
|
|
jobs:
|
|||
|
|
# 开始构建
|
|||
|
|
build:
|
|||
|
|
runs-on: ubuntu-latest
|
|||
|
|
env:
|
|||
|
|
HUGO_VERSION: 0.121.2
|
|||
|
|
steps:
|
|||
|
|
- name: Checkout
|
|||
|
|
uses: actions/checkout@v4
|
|||
|
|
with:
|
|||
|
|
fetch-depth: 0 # 获取 .GitInfo 和 .Lastmod 的所有历史记录
|
|||
|
|
submodules: recursive
|
|||
|
|
- name: Setup Go
|
|||
|
|
uses: actions/setup-go@v5
|
|||
|
|
with:
|
|||
|
|
go-version: '1.21'
|
|||
|
|
- name: Setup Pages
|
|||
|
|
id: pages
|
|||
|
|
uses: actions/configure-pages@v4
|
|||
|
|
- name: Setup Hugo
|
|||
|
|
run: |
|
|||
|
|
wget -O ${{ runner.temp }}/hugo.deb https://github.com/gohugoio/hugo/releases/download/v${HUGO_VERSION}/hugo_extended_${HUGO_VERSION}_linux-amd64.deb \
|
|||
|
|
&& sudo dpkg -i ${{ runner.temp }}/hugo.deb
|
|||
|
|
- name: Build with Hugo
|
|||
|
|
env:
|
|||
|
|
# 最大程度地向后兼容 Hugo 模块
|
|||
|
|
HUGO_ENVIRONMENT: production
|
|||
|
|
HUGO_ENV: production
|
|||
|
|
run: |
|
|||
|
|
hugo \
|
|||
|
|
--gc --minify \
|
|||
|
|
--baseURL "${{ steps.pages.outputs.base_url }}/"
|
|||
|
|
- name: Upload artifact
|
|||
|
|
uses: actions/upload-pages-artifact@v3
|
|||
|
|
with:
|
|||
|
|
path: ./public
|
|||
|
|
|
|||
|
|
# 开始部署
|
|||
|
|
deploy:
|
|||
|
|
environment:
|
|||
|
|
name: github-pages
|
|||
|
|
url: ${{ steps.deployment.outputs.page_url }}
|
|||
|
|
runs-on: ubuntu-latest
|
|||
|
|
needs: build
|
|||
|
|
steps:
|
|||
|
|
- name: Deploy to GitHub Pages
|
|||
|
|
id: deployment
|
|||
|
|
uses: actions/deploy-pages@v4
|
|||
|
|
```
|
|||
|
|
|
|||
|
|
{{% /details %}}
|
|||
|
|
|
|||
|
|
|
|||
|
|
{{< callout >}}
|
|||
|
|
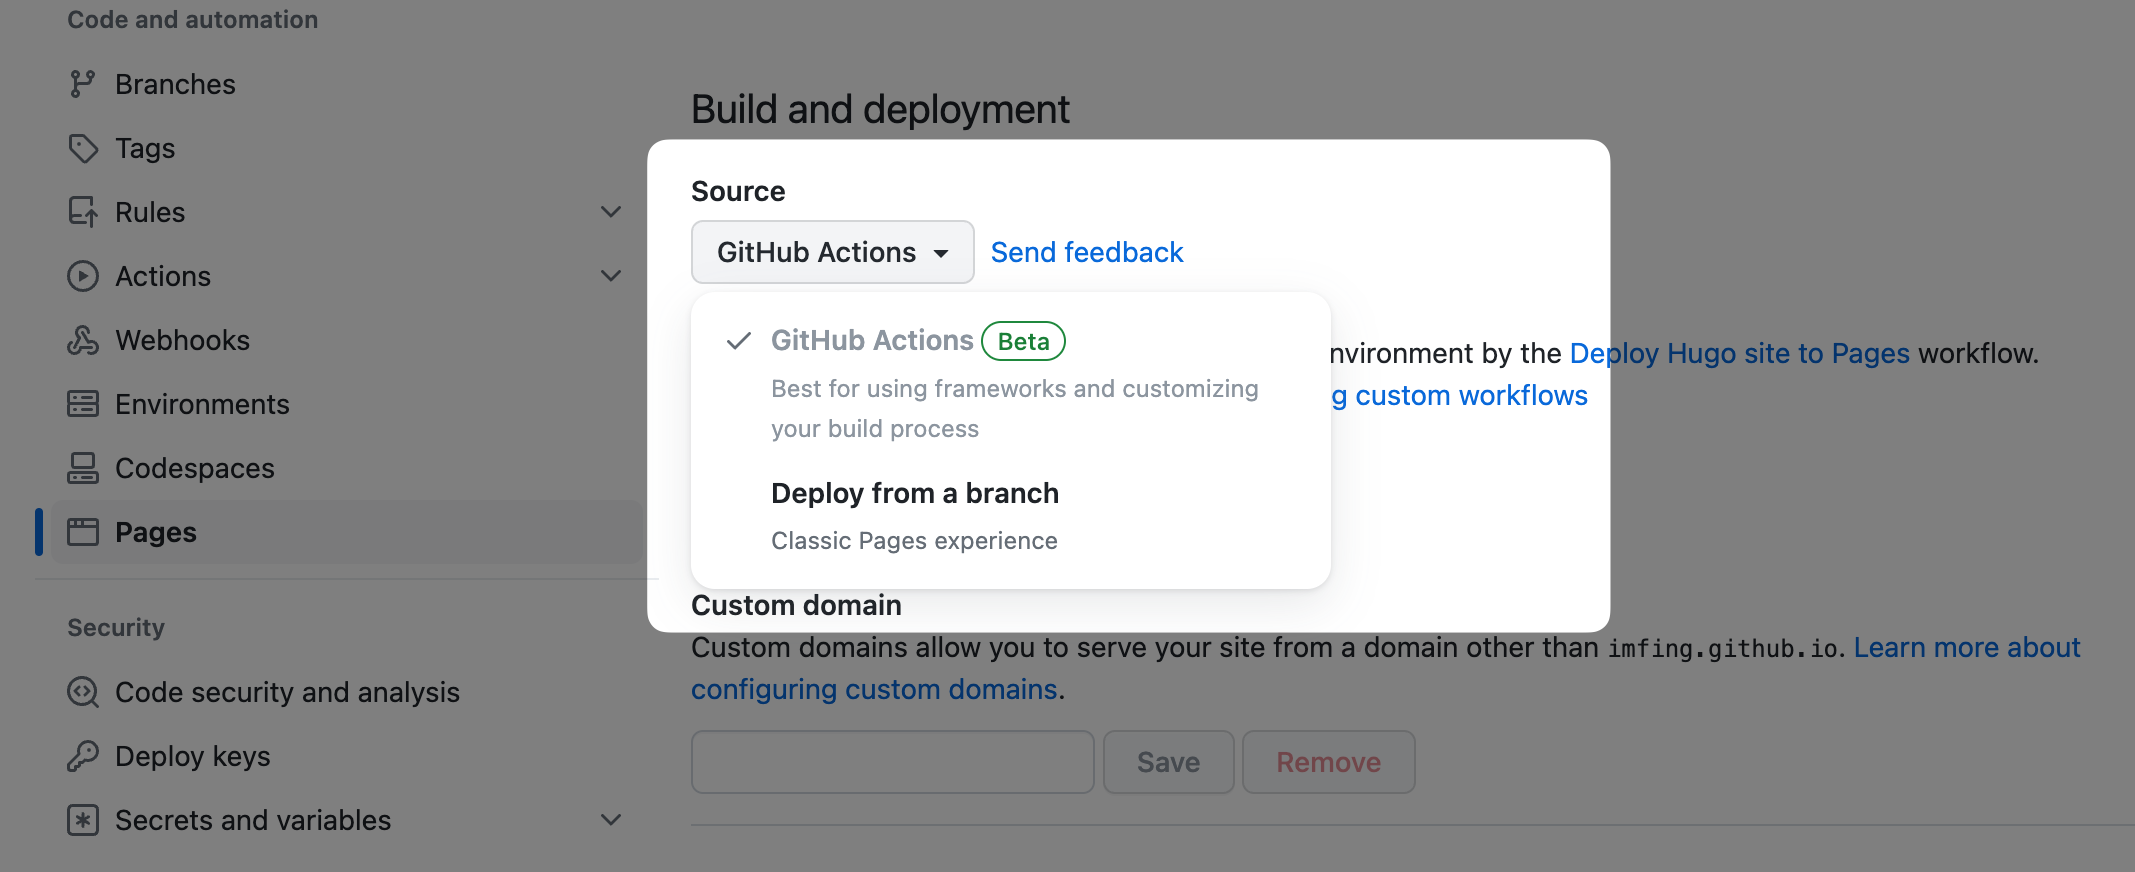
在仓库设置中将 **Pages** > **Build and deployment** > **Source** 调整为 **GitHub Actions**:
|
|||
|
|
|
|||
|
|
{{< /callout >}}
|
|||
|
|
|
|||
|
|
默认情况下,上述 GitHub Actions 工作流程 `.github/workflows/pages.yaml` 假定站点部署到 `https://<USERNAME>.github.io/<REPO>/`
|
|||
|
|
|
|||
|
|
如需部署到 `https://<USERNAME>.github.io/` 修改参数 `--baseURL`:
|
|||
|
|
|
|||
|
|
```yaml {filename=".github/workflows/pages.yaml",linenos=table,linenostart=54,hl_lines=[4]}
|
|||
|
|
run: |
|
|||
|
|
hugo \
|
|||
|
|
--gc --minify \
|
|||
|
|
--baseURL "https://${{ github.repository_owner }}.github.io/"
|
|||
|
|
```
|
|||
|
|
|
|||
|
|
如需部署到自己的域,请对应修改 `--baseURL`
|
|||
|
|
|
|||
|
|
|
|||
|
|
## Cloudflare Pages
|
|||
|
|
|
|||
|
|
1. 将您的网站托管在 Git 存储库(例如 GitHub)
|
|||
|
|
2. 登录到 [Cloudflare dashboard](https://dash.cloudflare.com/) 并选择你的账户
|
|||
|
|
3. 转至在账户主页面中 **Workers & Pages** > **Create application** > **Pages** > **Connect to Git**
|
|||
|
|
4. 选择你的仓库 **Set up builds and deployments** 提供以下信息:
|
|||
|
|
|
|||
|
|
| Configuration | Value |
|
|||
|
|
| ----------------- | -------------------- |
|
|||
|
|
| Production branch | `main` |
|
|||
|
|
| Build command | `hugo --gc --minify` |
|
|||
|
|
| Build directory | `public` |
|
|||
|
|
|
|||
|
|
如需了解更多内容,见:
|
|||
|
|
- [Deploy a Hugo site](https://developers.cloudflare.com/pages/framework-guides/deploy-a-hugo-site/#deploy-with-cloudflare-pages).
|
|||
|
|
- [Language support and tools](https://developers.cloudflare.com/pages/platform/language-support-and-tools/).
|
|||
|
|
|
|||
|
|
|
|||
|
|
## Netlify
|
|||
|
|
|
|||
|
|
1. 将代码推送到 Git 存储库 (如 GitHub, GitLab)
|
|||
|
|
2. [导入项目](https://app.netlify.com/start)
|
|||
|
|
3. 如果您不使用[hextra-starter-template][hextra-starter-template], 手动配置以下内容:
|
|||
|
|
- C 将构建命令配置为 `hugo --gc --minify`
|
|||
|
|
- 指定发布目录为 `public`
|
|||
|
|
- 添加环境变量 `HUGO_VERSION` 并设定为 `0.119.0`
|
|||
|
|
4. 部署
|
|||
|
|
|
|||
|
|
转至 [Hugo on Netlify](https://docs.netlify.com/integrations/frameworks/hugo/) 获得更多信息
|
|||
|
|
|
|||
|
|
|
|||
|
|
## Vercel
|
|||
|
|
|
|||
|
|
1. 将代码推送到 Git 存储库(GitHub、GitLab 等)
|
|||
|
|
2. 转至 [Vercel Dashboard](https://vercel.com/dashboard) 并导入你的 Hugo 项目
|
|||
|
|
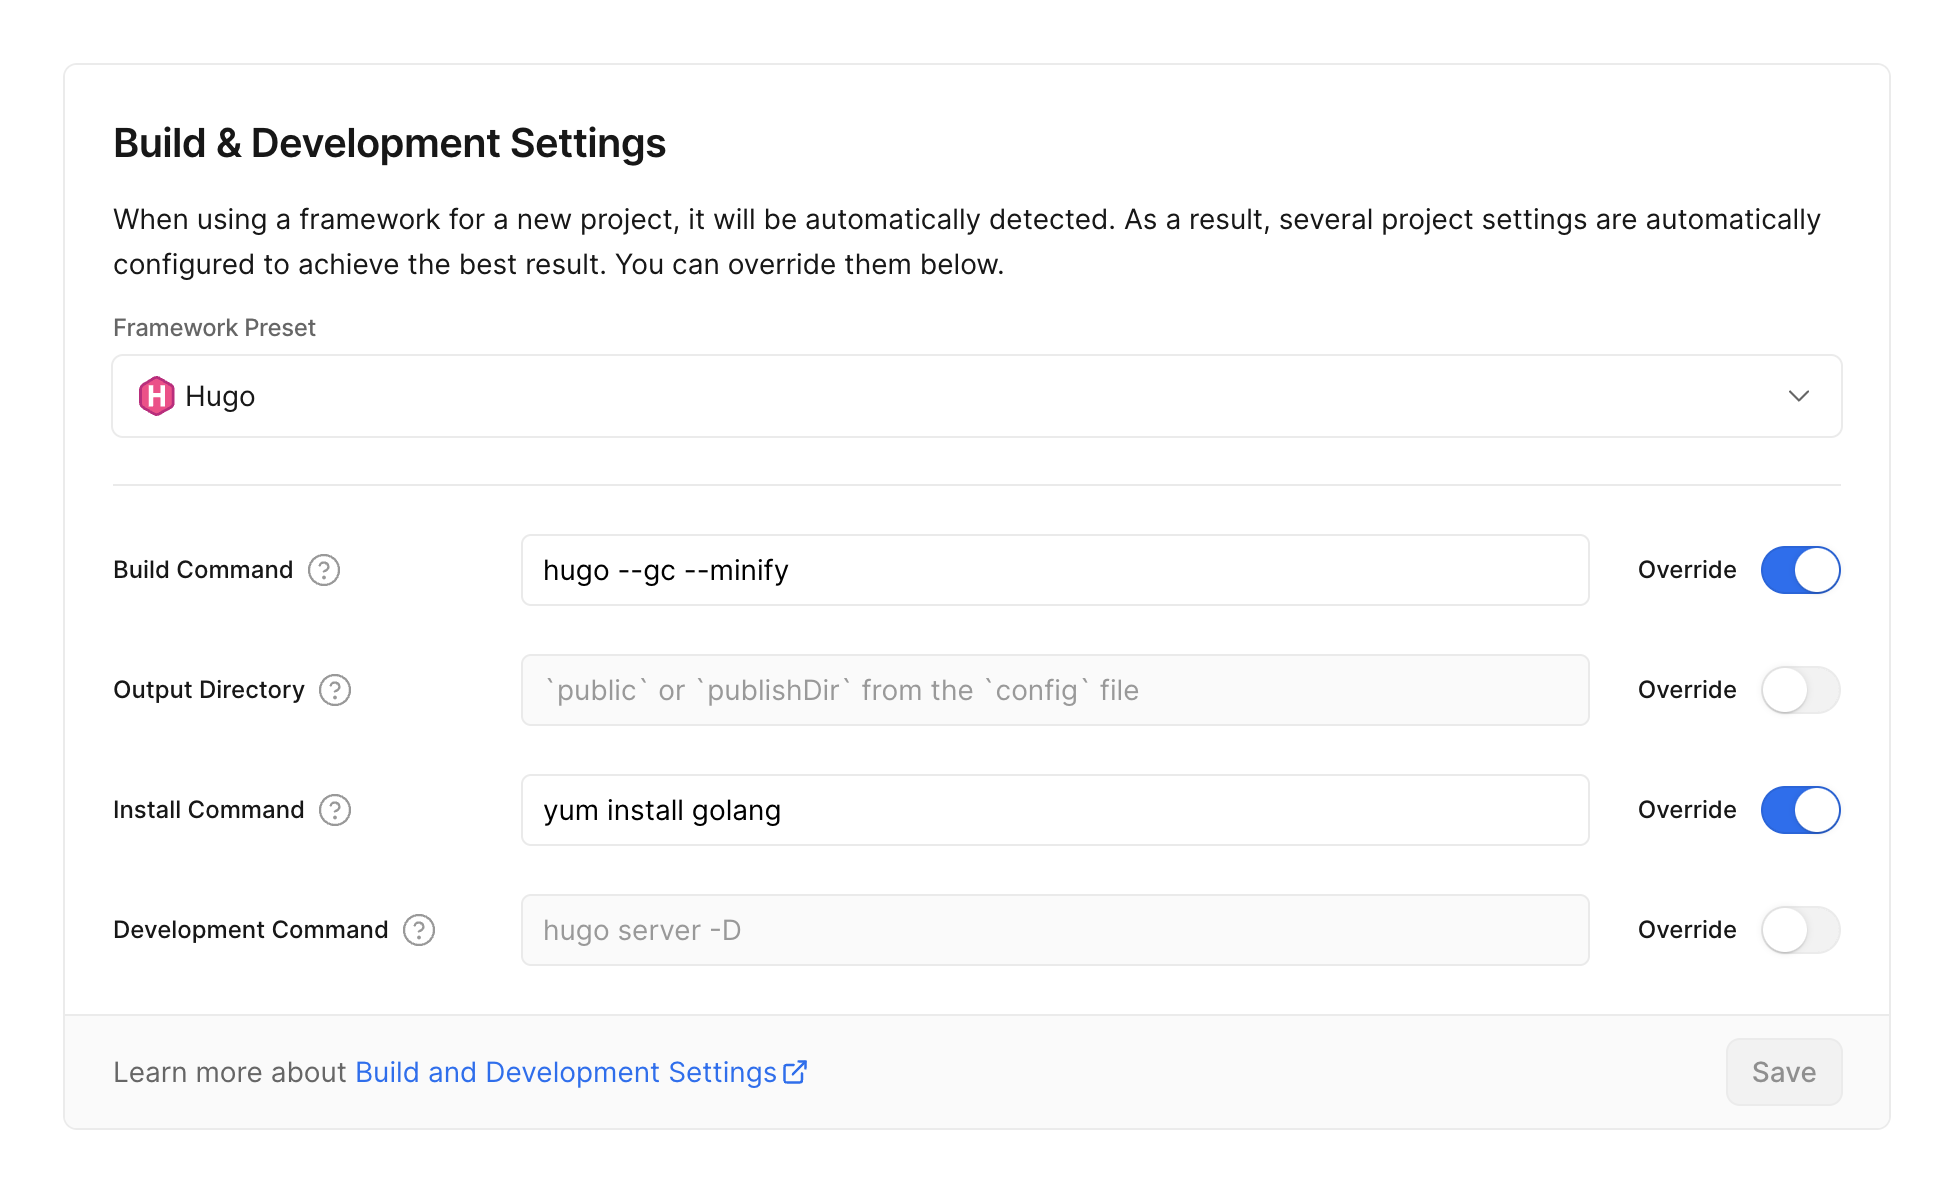
3. 配置项目,选择 Hugo 作为 Framework Preset
|
|||
|
|
4. 覆盖构建命令和安装命令:
|
|||
|
|
1. 设置构建命令为 `hugo --gc --minify`
|
|||
|
|
2. 将安装命令设置为 `yum install golang`
|
|||
|
|
|
|||
|
|
|